My Blessed Family!

My Blessed Family!

Sunday, April 29, 2012

Day 8: Peach-Whisky Chicken with Creamy Mash Potatoes

When I first read the title of this recipe, Peach-Whisky Chicken, I thought..whisky?  I'm not so sure about this.  But the alcohol will cook out.  My mom actually made this same recipe a couple of weeks ago and she said that it was divine.  I did alter the recipe though, cause I'm not big on eating chicken off a bone.  So we used whole chicken breast and I could say it was still divine. :)
By the time we started getting things prepared I realized that it was late.  It was already almost 5:00 I guess that's what happens when you lay on the couch and fall asleep. LOL

So I got all the ingredients together:
Oh another thing that I didn't have a choice to not use was peaches.  The recipe called for 4 peaches but every store that I went to did not have peaches.  So I had to skip that as well.  But it's ok I'm not being judged here....or am I? 
Since our chicken was so much thicker than what she used we started off a little different.  Since we already had the oven preheating anyways we went ahead and stuck our iron skillet in there to get it super duper hot.  Once it was in there for a few minutes we took it out then placed it on the stove and melted the butter with the olive oil.  Placed the meat in the skillet and cooked it till it was brown.

Now that looks pretty...just like we want it.
After you have it browned on all sides remove it from the skillet and then throw in your onions.  Get those softened up and looking pretty just like the meat was.

Now time to add in the whisky.  Please be careful doing this...sometimes adding alcohol to something boiling will cause fire.  So we made sure we had everything in place just in case.

After adding in all the whisky it's time to add in your BBQ sauce, peach preserves, Worcestershire sauce, and a 1/2 cup of water.  Whisk it all together and make sure that it's mixed well.  Put your chicken back in the pool of goodness.

As you can see my skillet was over flowing with goodness.  I actually had to take some of the sauce out in order for the chicken to fit.  But it's in there now and ready to get covered up with foil and placed in the oven and cooked until done.  Remember your meat needs to temp at 165.  FYI:  do not discard the sauce.  You can use that to place onto of your potatoes.  And if you still have some left over....freeze it and then you can use it for baking something later on in the week.
Final results:


Nothing goes best with a great chicken like this than creamy mashed potatoes.  Her recipe called for 5 pounds of potatoes.  Do you realize how many potatoes that is?????  I used 4 actual potatoes and we have some left over.  I peeled the potatoes and rinsed them off and cut them into pieces.  Know that the smaller you cut them the quicker they will cook.  Fill up the pot with water put it on the stove to cook and for right now that's it. :)
Once you have tested them with a fork and they are done drain them in a collander.  Place them back into the same pot and place back on the stove on low heat.  Use your masher and mash them up real well.  For me....lumps don't belong in "mash" potatoes.  Now add in your cream cheese, butter, and 1/2 and 1/2.  Well I didn't read the recipe before I went grocery shopping I guess, cause I didn't have any 1/2 and 1/2 I just used regular milk.
I never thought about putting cream cheese in your mash potatoes, I can tell you.....it's worth it.  Do it...don't hesitate about it at all.


Our Sunday dinner was not nothing big, but it was really good.  Down below you will see the recipes if you wish to make them as well. 


Enjoy...have a blessed week!

Saturday, April 28, 2012

Day 7: Saturday cooking

Our Saturday morning started off with a Scavenger hunt for the kids in the house.  Oh how they loved it and had so much fun.  They worked up a great appetite.

Breakfast:

Breakfast for us was homemade buttermilk biscuits & gravy, and bacon.  Like I've said before; everything is better with bacon. 
I always start off with all my ingredients out and ready to go, makes the process go a little faster.
Not a whole lot of ingredients; salt, Crisco, flour, butter, baking soda and baking powder, and buttermilk.  Next you combine all your dry ingredients together and stir that up real well.  Add your shortening and cold butter (make sure to cut them into pieces) and use your pastry cutter thingy and mix it all together real well until you have coarse crumbs.

Then add in your buttermilk.

Using a fork combine everything together until mixed well.  The dough will be sticky.  So if you need to add a little bit more buttermilk, by all means do so. We want these to turn out good and yummy to our tummy.  Once you have your sticky dough place it on a floured surface and then roll it out to the thickness you wish your biscuits to be.

Using a biscuit cutter; if you don't have one you may use a cup, but use that and cut the dough until you have run out of room.  Place your raw biscuits onto a greased cookie sheet and bake. 
Make sure that if your biscuits are thin you adjust your baking time...I almost burnt mine.  I took them out of the oven just in time.  I wasn't pleased with the presentation of them, but the taste was really good. 
They weren't big and fluffy, but it's ok we all ate them.  Breakfast is now served:

After breakfast when my husband is home we always have a toss up of who is going to clean up the mess.  By this time we are full and not wanting to even move from the table.  But can you guess who won the toss us?

Which of course...I finally got up and helped him.  I didn't want him to feel alone.

Dinner:

We kinda really skipped lunch today.  Still very full from breakfast.  And a yummy dinner ready for us so we had to make sure that we had a big spot in our tummy's. 
Chicken spaghetti was the choice for dinner today.  I went away from my ritual, cause I didn't get all the ingredients together at one time.  I started preparing the chicken cause I knew it would take the longest.
Cleaned it up real good...eww gross.  Make sure to wash your hands afterwards.  Placed it in my soup pot and filled it up with water.

Stuck it on the stove until the thermometer read 165 degrees.  Went ahead and got my onions and bell peppers cut up and the other ingredients ready to go.
Look at that big bag of cheese, don't that look good?  Don't worry we won't use the whole thing in this recipe.  Now here is where I went a little away from the recipe (Here is the recipe).  The recipe calls for pimento's, I did not use those cause of my kids.  And you are actually suppose to just put raw onions and bell peppers in it, oh no not me.  I don't think raw crunchy things like that in my food.  So I went ahead and softened them in some butter.
Now talk about a great smellin' house.  I really have tried to find a candle that is called onions and bell peppers.  You know Thanksgiving morning that smell in the house....oh that's what it smelt like...love it.

Once your chicken is done take it out and place in a bowl to cool off, once it's cooled off you may de-bone it.  Take out 2 cups of the broth and set it aside.  Now place your spaghetti in the broth and cook till done.  I added a little bit of salt in the broth, but it's not necessary.  After your spaghetti is done drain.
Now your onions and bell peppers are done, your spaghetti is done , and your chicken is de-boned.  Place your spaghetti, cream of mushroom soup, bell peppers and onions, cheese, chicken, and seasonings in a bowl.  Mix together well.  Taste.  HA HA....this recipe actually tells me to taste.  My husband can't make fun of me for testing.

If it's all good...place in a glass dish.  Let's add more cheese on the top.  Ready to bake.  Bake for 35 minutes, just till it's bubbly.
Now time to eat:


This was some really really good chicken spaghetti.  It makes so much, so now we have left overs in the freezer for another night.  The only thing I would recommend is to not put too much cayenne pepper or black pepper in it.  It was a little spicy for my kiddos.

Dessert:

Whoever said that you don't "need" dessert after you eat a great meal like this is CRAZY.  For me and my kids it's like we leave this extra space in our bellies for dessert.  It's a must in my house.  So tonight's dessert will go with tomorrow's dinner as well.  YIPPEE....no dessert makin' tomorrow, just dinner.  Rest...is that what I'm thinking.  Sure is!!!

I made a chocolate sheet cake.  Just the word chocolate makes it sound good.  Let's see how this goes....
Now these are the ingredients just for the cake.  You do use those 2 whole sticks of butter.  Why does butter taste so good?  Do you know?
Mix your dry ingredients in a bowl real well; Flour, sugar, and salt.  In another bowl mix your eggs, buttermilk, vanilla, and baking soda with a fork until combined. 
In a sauce pan on the stove melt your butter.  Once your butter is melted add your cocoa.  After all that is combined and melted well add in 1 cup of boiling water.  I know this sounds confusing once you read this recipe it will make more sense to you.  After adding the water and letting it boil just a little while then remove from stove and add to your dry ingredients.


Mix well and allow your chocolate to cool down a little bit; while stirring the cool down process should happen.  Now add in your egg mixture.  If you were to add those egg into that hot chocolate it would turn to scrambled eggs, you don't want that. :)  Mix in the eggs real well. 
Time to place it into a cookie sheet, A.K.A. jelly roll pan.  Funny story about a jelly roll pan.  During Christmas time I was at WM searching for a jelly roll pan cause I needed to make a pumpkin roll.  And it called for a jelly roll pan.  I'm looking and looking.  Even reading the shelf labels...jelly roll pan?  I wasn't finding one.  So I called my mom....hey mom!  Where can I find a jelly roll pan at?  She replies....at WM by the pans.  It's not here I said.  She was confused, WM defiantly sells cookie sheets.  Well mom I'm not looking for a cookie sheet I'm looking for a jelly roll pan.  Jennifer.....she replies.....it's the same thing. 
Back to the cake.  So you've placed your mixture into your cookie sheet.
Now time to bake, but for only 20 minutes.  While your cake is baking you want to prepare your icing.  This cake is iced while it's hot.  That's the best way! 
Getting all the ingredients together...       
                                                    
In a sauce pan on the stove melt butter, once melted, add in your cocoa...just like we did for the cake batter.  Once that's melted and mixed well, add in your milk and vanilla.  Now time for the powder sugar.  I sifted it so it wouldn't clump up...but that's all up to you.  Mix in the powder sugar real well.  You want it really smooth.

Your cake is now done...Immediately pour the icing over it evenly.

Be careful cause as I was icing the cake the icing was slowly coming out around the sides.  It's ok..just use your finger and wipe it off.  Then lick your finger...yum!!!
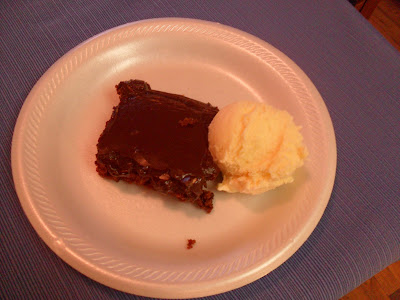
So now the cake is iced and ready to be eaten.
Hey!!!!!!!!!!!!!!!!!!!!!!!!!!!!!!!!  Where are my corners.  Mamaw have you been to my house.  Not really!! 
Funny story.  Whenever my mom makes her Texas Chocolate Cake the corners always end up missing.  Usually it's Mamaw taking a corner to test it.  So of course here I am testing it just like my Mamaw.  Love that woman!!!!
Enjoy this cake with a scoop of ice cream.
Now who's turn is it to do the dishes....


Day 6: Homemade Tortillas

I'm finally getting to sit down in peace in quiet...what's that you ask?  Well I'm not so sure cause I don't get it too often.  I have the candles going no TV on, just me and the mice.  Ha...mice....no it's me typing it just sounds like mice, so I've been told. 
Back on track; I'm finally here posting about the homemade tortillas that I/we (my husband and I) made this past Monday evening for my Home Group Bible Study.  My husband is the one that made the dough so I'll explain it to the best that I can.  I was taking a nap cause I had surgery that morning and I really wanted to go to my Bible Study so I wanted to make sure I got some rest.  The wonderful guy he is; he started getting everything ready for me.
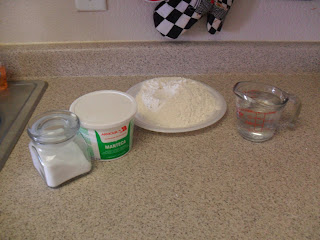
That is actually all of the ingredients that you use; kosher salt, lard, flour, and water.  Some people think that it's so hard and takes so much work to make them, not really...their easy.
Now just place the flour and salt in a food processor...we use that cause it's easier to mix everything together.  Give it a few pulses. 
                                

Now place the lard in with the flour mixture, make sure to put it in a couple of chunks...not all in there in one big clump.

Look how great he did on the picture taken, didn't he do well?  Mother approved!
Focus Jennifer... :)
Now pulse it again 10-15 times until it resembles coarse crumbs.  Once you have the crumbs have the food processor on a setting to keep it going.  Slowly add in the water.

Within 30 seconds it will have made itself into a dough ball.  Now with a 1/4 cup of flour flour your surface and put your dough ball onto the surface.  Knead it with your hands until it's no longer sticky.  Wrap it up in plastic wrap and keep at room temperature for about an hour.
Have I ever mentioned how much I do NOT like plastic wrap.  No matter what it always sticks together when you pull it out of the package and rip it off.  Why?  Is there anything I could do to not let that happen.  I just don't like that stuff.
After your hour has passed now it's time to make your small dough balls.  You should be able to make 8 balls from 1 serving.  I actually made 2 servings cause I was feeding 6 people.  So I got exactly 16 dough balls.

Keep them covered with a dish towel until you are ready to roll them out.  When ready take a rolling pin and roll each ball out into a 7 inch flat round tortilla.  What I did was roll one out then cooked it, then rolled another then cooked it...you get my drift. :)


Those do look pretty.  And they sure did taste wonderful.  I will tell you this; they didn't last long.  Homemade tortillas are always better.  I hope you take the time to make yours next time you have fajitas or tacos.  Here is the recipe.
Enjoy!

Sunday, April 22, 2012

Day 5: Sunday Dinner/Spicy Dr. Pepper Pulled Pork, Onion Strings, and Vanilla Bean Scones for Dessert

It's Sunday and like normal we were in the kitchen from the time that we arrived home from church.  But oh man was it worth it.  The dinner we chose last weekend for this weekend was Spicy Dr. Pepper pulled pork with Onion Strings.  If you like the Onion Strings at Chili's you will for sure love these.  And for dessert we had Vanilla bean scones.  Which made so many that I think I'll take the remaining ones over to my friend Tara's house for her and her family. 
It's strange to say that when you are in the kitchen cooking and preparing for a Sunday meal like this you always get the dessert done first.  So that's what I'll start with here.

Vanilla Bean Scones:

Here are the ingredients that you will need.

Just FYI, the candle is not part of the ingredients.  With such little counter space I had to find a little bitty spot to place all of these.  My husband was helping so wonderfully in the kitchen, but taking up SO much space.  But he was hard at work getting the vanilla beans prepared for me, so I let him have his space.


What he's doing there is splitting the vanilla bean in half and then taking all the good stuff out of the middle of the bean.  That good stuff there is going to be placed in some heavy cream and let sit for about 15 to 20 minutes.
While that's sitting and getting all tasty sift your flour, sugar, salt, and baking soda together.  And then take your butter...wow....2 sticks of butter, that sure is alot.  Cut your sticks of butter into pats and place them in your bowl of flour mixture and use your pastry cutter to get it all crumbly.

This sure was hard work on my "guns" :) 

In another bowl mix together your egg and vanilla cream mixture that's been sitting there getting all tasty. 

Once you have that all mixed up then it's time to pour it into the flour/butter mixture.  Mix together with a fork.  When it's mixed together real well place it on a floured area.  Move over honey I'm taking up all the space now :)
Roll out into a square, I had to use my hands to make it like a square.  Don't be scared to do that. :) Next you want to take your unformed square and make it like a formed square by using a pizza cutter.  Again..this makes sense to me hopefully it makes sense to you.
Here is what you want it to look like.

Looking at that now.....man that looks good.  Next time I think I'll use a ruler and make sure that it's "perfect".  Just joking, well maybe not.  That actually sounds like a good idea.
Now you want to make your triangles, below you can see the pictures on how we did that.


Place your triangles on a cookies sheet and bake for 18 minutes.  Once those 18 minutes are up take them out of the oven and let them sit on the cookie sheet for about 15 minutes. This is what they should look like when you take them out of the oven.

 While they are sitting on the cookie sheet for those 15 minutes you can start on your icing.  This is the point where I noticed......MAN....I'm out of powder sugar.  I guess a small box of powder sugar that is more than half way isn't going to be enough when you need 5 cups.  Off to the store my honey went...what a sweetheart he is.  As soon as he came back from the store I grabbed the powder sugar from him measured it out and sifted those 5 cups.

While I'm sifting away my husband is over there getting the good stuff out of another vanilla bean and placing it into the milk.  It needed to sit there for at least 10 minutes.  It took almost those whole 10 minutes sifting all that powder sugar. 
After the 10 minutes was up I placed the vanilla/milk mixture into the powder sugar and used the whisk to get it all mixed up real well.  I had to add a little bit more milk so that the icing wouldn't be too thick.  So now...time to start icing these bad boys.
You can ice just the top or you can dunk it in the icing and ice the whole thing.  We decided to ice the whole entire thing.  Now they are all iced and ready to go:
But be prepared they are very sweet.  These would go great with a cup of coffee.  Here's the link if you wish to make the scones yourself.  Vanilla Bean Scones


Now onto the mail entree of our Sunday dinner. 

Spicy Dr. Pepper Pulled Pork:

This meal here is something very easy to prepare doesn't take alot of ingredients.
As you look at the ingredients you see chipotle chili's in adobo sauce.  My husband asks me, what's  adobo sauce?  I said you....oh wait...that's not adobo that's a dodo.  Well he didn't think it was too funny, well I thought it was.  Back to the meal here. :)  Place your onions in the bottom of your pot.  The recipe actually says to place in a dutch oven, well we placed it in our crock pot; which works perfectly fine.  So we placed those onions in the bottom of the crock pot and tossed the meat in there.  Season time....salt and pepper and that's it.  Just enough to taste, no real measurements there.  Throw in the brown sugar and the chili's with adobo sauce.  We actually didn't use the whole thing cause we didn't want it too spicy for the kids. 
Then pour in the good stuff....Dr. Pepper.
And that's it...place the lid on it and let the crock pot do it's job.  We cooked it for 8 hours and turned the meat every 2-3 hours.
Now look how good this looks...


This tasted so good.  I think it could of been spicier but it's all good. :)
If you want to make this here is the link: Click here for recipe

Onion Strings:

Yes these are just like the ones at Chili's....probably better.  They are so good....greasy....but I think that's what makes them good.
Cut up your onion, the good thing about making these at home is that you can make them any size you want.
We made them thin so that you can't really taste the onions.
Place them in a shallow dish and pour in your buttermilk, time to take a bath you onions.


These will need to soak for about an hour.  When these are done soaking mix your flour, salt, pepper, and cayenne pepper.  If you want them to have a little kick...add more cayenne pepper.  Now it's frying time.  Heat up your oil to 375 degrees and then take a good hand full of the onions with some tongs and place it in the flour mixture.

Tap off as much of the extra flour as your can.  Place in the heated up oil.  Be prepared it will be hot.
Once they are a golden color, they are done and can be removed.  Place them on a plate covered with paper towels.  Try not to eat too many before dinner is served.  Here is the recipe.

NOW DINNER IS SERVED!!!!!!!!!!!!!!!!!!!!