Do you want to make this? If so let's get started. I made the actual cake last night and ended up icing the cake and assembling it this morning.
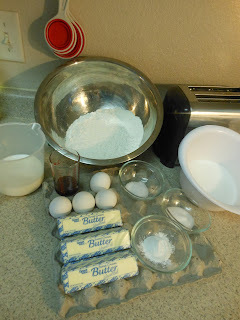
Here's what you will need for the actual cake. 2 sticks of unsalted butter (at room temperature), 3 cups of all-purpose flour, 1 tbsp of baking powder, 1/2 tsp. salt, 1 3/4 cups sugar, 4 large eggs (at room temperature), 1 tbsp vanilla extract, 1 1/4 cups of whole milk.
If you are anything like me...you count the items in the picture and you notice there is 1 extra item. But I don't think there is anyone as crazy as I am. :) I measured out some baking soda but that does NOT go in the cake...so only the items I mentioned above is what goes in it.
Preheat your oven to 350 degrees. Spray 2 round cake pans with bakers joy; make sure to coat thoroughly so that your cakes don't stick.
Whisk your flour, baking powder and salt in a bowl until combined.
Beat your 2 sticks of butter and sugar with a mixer on medium high speed until light and fluffy.
Oh wait!!! Make sure to each egg crack it...one at a time. Yeah we shouldn't assume things should we.

We now need to add in our flour. Let's do 3 batches....1....2....3...starting with flour then add milk....then add flour...then add milk....more flour....last part of the milk....then all the flour. Make sure to start with flour and end with flour.
Keep mixing till smooth.
Divide the batter between the two pans.
In that picture the cakes look like gravy....yum...gravy. Biscuits you say?
Sorry back on track here.
Bake for approximately 30 to 35 minutes; till the cakes are lightly golden on top and toothpick inserted in the middle of the cakes comes out clean.
Silly I know....but that's just me.
Oh my...I'm nervous......
Yippee....look at that. So I guess my bakers joy skills are good. How about yours? How did you do?
Oh wait...you are probably just reading this now and then going to make it later. So re-read the top part and just skip the last 2 questions. Then if you are reading this the second time cause you are making it...now you can read the last 2 questions. So...how did you do?
Place some paper towels over the cake to cover it and place your pan back on top. One at a time..
Oh my goodness....where did my cake go? Oh yeah duh I covered it with paper towels.
Now just let them completely cool.
La
La
La
De
De
De
Da
Da
Da
Ok..now let's make the icing. Yum yum!
1 stick of softened butter, 8 oz of softened cream cheese (well room temperature), 2 tsp. vanilla extra, 2 pounds of powder sugar, and water. There is no exact amount of water so we are going to play it by ear, sight, taste, whichever you prefer.
Cream together your cream cheese and butter till all mixed together.
Lookin' good.
Now add in your vanilla extract. And mix well into the cream cheese and butter.
Add in your powder sugar; little bit at a time. Make sure to not have your mixer up too high cause then all the powder sugar you put in there will end up on the floor. How do I know? Cause it happened to me...so I know from experience. Trust me on this one.
So you are adding a little bit of powder sugar..mixing together...add a little bit of water....more powder sugar...more water only if needed....add the powder sugar till it's all gone. Only add water if it looks too thick.
Here's what it should look like at the end.
Not too thick and not too thin; just right to be able to spread on your cake.
Make sure to keep this covered until you are ready to use it cause it will thicken up quick.
Let's go ahead and color our coconut. All you need for this is a big freezer bag, green food coloring, and coconut of course.
Place your coconut in the freezer bag. Then put a few drops on the side of the bag..NOT right on top of the coconut cause then you will have some parts that will be too dark. You just want it to be a light green color since it will represent the grass on top of the cake.


Now we are ready to ice the cake and make it all pretty.
Take one of the cake and place it on your platter and place a spoon full of the icing on top it.
Spread it around to cover the cake.Place the other layer on top of that.
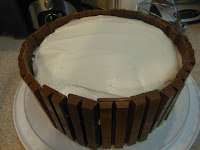
And ice away. Start on one section of the cake and allow the icing to smooth down the edge. Continue till all of the cake is covered.
Don't worry about the way the icing looks it's going to be all covered anyways. Wow...that's really hard for me to say. But since I had my husband right there telling me over and over again...IT'S OK. I finally said..whatever....fine....I'll move on.
We are now going to put the kit kats around the edges...it took exactly 11 packages of kit kats. I placed 2 of them at a time on there instead of 1. Continue around the whole cake till it's all covered.
Let's put our grass on top of that.
And now our eggs.
And we are done....PRETTY!!! We have an Easter basket cake.
ENJOY!!!


