My Blessed Family!

My Blessed Family!

Saturday, September 29, 2012

Tacos in Pasta Shells

Back in 2007 for Mother's Day my mom gave me a hand-made cookbook.  Lots of wonderful recipes in it;  wonderful family favorites.  I have this one recipe that I make quite often; oh it's so yummy.  Take a look:


The only time consuming part of this dish is putting the meat mixture in the shells; but other than that it's really quick and easy.

Here's what you will need:

1 1/4 lb. hamburger meat, 3 oz. of cream cheese with chives, 1 tsp. salt, 1 tsp, chili powder, 18 jumbo shells, 2 tbsp. butter, 1 cup prepared taco sauce, 1 cup shredded cheddar cheese, and 1 cup of Monterrey jack cheese.

Preheat your oven to 350 degrees.
Cook your hamburger meat completely.


While your meat is cooking cook your noodles. 

When your noodles are done; drain them and rinse them and  place them back in the pot you cooked them in.  Toss them with the 2 tbsp. of  butter.
Now back to the meat.  When that's done drain all that yucky fat off and place it back in the pan.  Reduce the heat to medium-low and add the sour cream, salt, and chili powder.

Mix well and simmer for about 5 minutes. 
Let's start filling those shells.  Take a spoon full of meat mixture and place in the shell.
And complete that process for all noodles....as you fill each one place it in a cake pan with the folded side down.  Try to close them as best as you can so all your filling don't fall out.

You're almost done..

Pour the taco sauce over each shell.

Cover with foil and bake for 15 minutes.
After the longest 15 minutes ever are up remove from the oven and uncover and top with the cheeses.

Oh my....that looks good already.  But you're not done.
Place back in the oven and back for another 15 LONG minutes or until cheese is melted and bubbly.
And then place on a plate; grab a fork...and dig in.


Fun with the kids!!!

What a great day we had a couple of weekends ago.  I was trying to think of something to get the kids involved with something and to have fun.  So I decided that we would make hand cookies.  I've never done it before and thought it would be really fun.  Here's our final picture.  Remember I love starting with the final outcome cause that just draws you into the blog :)

Cheyenne's Hand Cookie                                             Terran's Hand Cookie
It was all about the kids so we won't show mine.  Let's go ahead and get started on how to make these so you can make them yourself.  We will start with making the cookies first.
Cream together the sugar, shortening, vanilla, and orange zest.
The next few steps will be really quick steps.

Add the eggs in...
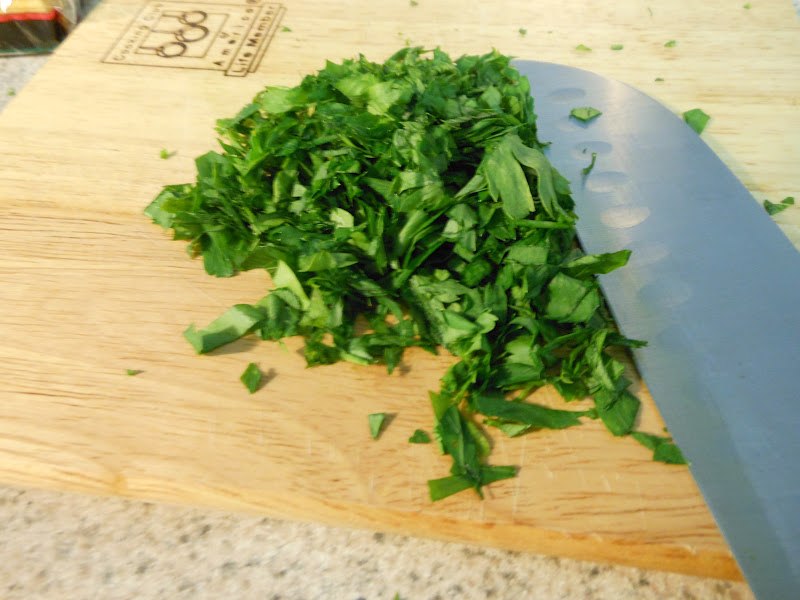
Beat the eggs until they are light and fluffy.  Don't mind my green thumb...
Add the milk and mix well.


In a separate bowl sift together your flour, baking powder, and salt.  Then add into your mixing bowl with the other ingredients.
Make sure the blend it completely.  Once all blended together divide the dough in half and slightly flatten between two sheets of wax paper.


Now refrigerate for about an hour...or if your children are impatient like mine were I stuck it in the freezer for 20 minutes.  While the dough is in the freezer or fridge; whichever way you choose; you can go ahead and get your egg yolk glaze done. 
Yolks???? When I say it it actually sounds like; yoke.  Then of course when my husband says it he makes sure he says YOLK.  Which way do you say it?
Separate your eggs, placing just the yolk into an individual bowl.
You can reserve the egg whites for breakfast the next morning; very healthy.
Add 4 teaspoons of water and a different food coloring to each of your yolks and combine well.


That picture is of my yellow mixture.  By this time your dough should be ready depending of course which method you chose to chill the dough.
Roll the dough our onto a lightly floured surface.

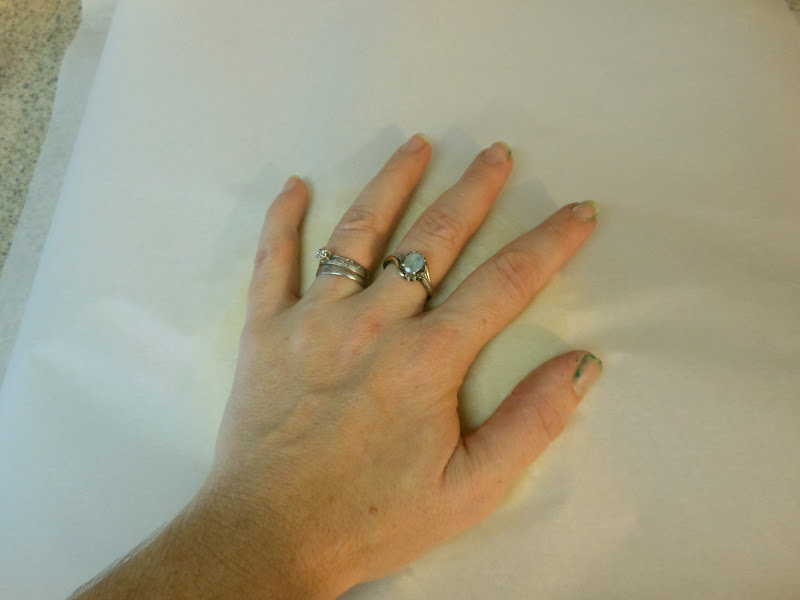
Now it's time to cut the hands out.  Of course wash your hands before placing your hands on the dough.

Make sure to use soap kiddos................................
Preheat your oven to 375 degrees.
Use a dull knife and cut out each hand carefully.


Transfer the hand cookies to a lightly greased cookie sheet.....please be careful don't break off any fingers while transporting to the cookie sheet.
Now it's time to start the painting.  Let's paint the cookies however you wish with the egg yolk glazes.
Make sure to use a soft brush when painting.


Bake the cookies now for about 6 minutes; DO NOT allow the cookies to get brown.  When the cookies are done place them on a wire rack to cool. 
Let's make the frosting while the cookies are cooling.
Combine the powder sugar, butter, heavy cream and vanilla in a mixer.


Blend until light and fluffy.  Once light and fluffy you can place it into a piping bag.  If you don't have a piping bag I have a little trick :)
You can place it in a baggie, remove all the air from it, then cut the corner of the baggie...now you have a homemade piping bag.
Let's get to decorating.
Once decorated......ENJOY!!!


Saturday, September 8, 2012

Best Muffins Ever :)

We started our wonderful restful Saturday with some really good muffins.  These muffins are called Good Morning Glory Muffins.  Good?  Oh yes...they really are.  They just taste fabulous; you might need to try them for yourself in order to believe me.  Take a look at these muffins.
Let's get started in making them.
For the muffin batter you will need:
Let's see we have flour; sugar; baking powder; unsalted butter; shortening; orange marmalade; orange juice; vanilla extract; and 3 eggs (beaten in a separate bowl).
Sift together the flour, sugar, and baking powder.

Then using a handy dandy pastry cutter cut in the butter and shortening.

In a small bowl mix the marmalade, orange juice and vanilla together. Oh the aroma coming from that bowl sure does smell good.  Go ahead take a big ol sniff. :)

I saw you...you were trying to sniff the picture here on the screen.  It's ok; I won't tell anyone.

Pour the marmalade mixture into the flour mixture and then pour the eggs into the flour mixture bowl too.
Mix all the ingredients together gently; trying to use 10 large strokes.  That's what the recipe says....well let's just say to mix it together well it takes more than 10 large strokes.  If you can do it; awesome, way to go.

Now that can sit in the bowl for a few minutes while you get your topping mixture together. 
Here's what you will need for the topping:
Let's see; we have....sugar, brown sugar, melted butter, cinnamon, nutmeg, salt, and wheat germ.
Mix together in a small bowl the sugar, brown sugar, butter, cinnamon, nutmeg, and salt. 
That's was easy huh?

Fill your muffin pans with the batter.

I just love my color coated ice cream scoops...thanks to Taco Bell. Don't worry I didn't just take them.  When my husband worked there they went thru a remodel and they were given to him.  But that has nothing to do with these muffins.  Once you get the muffin pan all filled sprinkle about 1 heaping teaspoon of the topping on top of the muffin mix.
Sorry don't have a picture of that cause I accidentally deleted it.  But I'm sure you won't need a picture for that step.
Once you get all the muffins covered with the topping sprinkle 1/2 teaspoon of wheat germ over the topping.  You can put more if you want more of a crunch.

Bake at 375 degrees for 20 to 22 minutes.  Remove from the muffin pan when done and dig in.  They are so soft and moist.

If you would like to make these click here for the recipe.

Wednesday, August 22, 2012

Baked Chicken with Buttery Lemon Parsley Noodles

Last one...then I'm finally all caught up on my blogs since vacation. 
This recipe is what I made last night for dinner.  I wasn't sure how I wanted to cook my chicken breast so I just went out on a limb and decided to bake it.  I like to start off my blogs now with a final picture....so while you are reading your mouth is watering. :)
I cut all the chicken breast in half and placed it in the cake pan.  Seasonings I used...um...lemon pepper, salt, pepper, season salt, and garlic salt.  Then I sliced some red pepper, green pepper, and onion and placed that on top.  Then sliced up 1/2 a stick of butter.  And this was my results before it was baked.

Now after......

All I did was bake it covered at 350 degrees for...well...not sure.  Till it was done approx. 30-45 minutes.  I think...you know I guess I should keep track of all this while I cook my own meals and don't have a recipe.  Sorry about that.
Now for the noodles.
Here's what you will need:

Pepper, salt, butter (yes more butter), lemon, pasta (spaghetti type of your choice), and parsley.  Mince the parsley really fine.

Cook the pasta like normal....boil water then place the pasta in the pot and cook till done.  I did take a picture of the pasta in the pot; but....I won't be a goober and post it. :)
When your pasta is done; drain and set aside.

Now melt your butter in a skillet.

Ok...that's a goober there. :)
While your butter is melting I would recommend zesting your lemon and squeezing the juice from the lemon.  It's much easier to have it all prepared. 
When your butter is melted toss your drained noodles in there.

Stir them around for a little bit.  Then toss in your 1/2 a lemon zest, lemon juice from a whole lemon, and salt and pepper.  I went outside the recipe and added a little bit of garlic salt. Now add in your parsley.

Toss around to mix it real well...and then you are done.  Very simple. 
Place your noodles on the plate.

Then plop that chicken on top.

Now dig in!!

Here's the recipe of just the noodles; the chicken is what I made on my own.
Click here for recipe!!