
We started the morning off with Berry Butter French toast and then for lunch we had chicken quesidillas and then moved the dinner menu consisted of: Perfect pot roast with carrots, creamy mash potatoes, buttered rosemary rolls, and our dessert was mocha brownies. There are only 2 things mentioned above that will not be included below which are the creamy mash potatoes and buttered rosemary rolls which were mentioned in a previous blog.
Now onto the good stuff.
Breakfast: Berry Butter French Toast
I started out with all my ingredients. I've said it before it makes it so much easier to have everything ready, so when it's needed it's right there and you aren't rushing around the kitchen.
Back on track here...
What I did was make the berry butter a day in advance since it has to stay in the fridge for a couple of hours anyways. I just didn't see any sense in getting up early Saturday morning just to make the butter so it would have time to rest in the fridge. I laid out a sheet of aluminum foil and then placed a sheet of plastic wrap right on top of the foil. Took my "softened" butter....1 stick.....and placed that into my mixer.Whipped that up real good.


Now don't laugh.....but....now place it into a log shape onto the plastic wrap.

As you roll it up it will shape. Start with rolling the plastic wrap around it first and then the foil.


Twisting it at each end and tightening it up real well to compress it together. Repeat those steps with the blackberries. Then place them in the fridge to harden up a bit.

Now add in your vanilla, sugar, and lemon zest. Whisk that together real well. Place a slice of your bread into the mixture and coat the bread. Words of advice here don't use just regular bread. You must use a thick sliced bread or when you cook them it will fall apart....I know from experience. :)

After coating your "thick" sliced bread now it's time to cook them. I started out in my iron skillet with some butter, not wise. Cause it just fell apart. I think if I would of had a thick bread it would of worked out perfectly fine.

And now onto the final results:


Lunch: Chicken Quesidillas
The chicken that I used for this was leftovers from the recipe Fried chicken tacos. This was something quick and simple....and YUMMY :)
I had to get an assembly line going for this. Corn tortillas, cheese, chicken, and of course a pan of hot oil.
I took the corn tortilla and placed the chicken on top of that.

Which I was going to add a picture of it, but for some reason it won't add it, sorry.
Once the one side was done I slowly flipped it over and fried the other side. Then when that side was complete I removed it from the pan and let it cool slightly before cutting.
Cut that bad boy in half and oh man did it look good. But I'll let you be the judge of that.

Dinner: Perfect Pot Roast W/ Carrots
Main Entree was wonderful. Perfect Pot Roast.

Cut up your onion. Right down the long side part of the middle of the onion. Hold up...that just doesn't make sense. Let's try this again. I know I know there's a backspace button, but I would rather just keep on typing instead of using the backspace. Cut the onion in half from root to tip (those were Pioneer Woman's exact words). Peel the skin off. Get your oil nice and hot in the pan. While that's getting hot you can get your roast salted.
Once your oil is hot place the onions in there.

After your onions have browned a little bit on each side remove them and place them on a plate and then throw in the carrots. Which those are cut into 2" pieces (do not peel).

Get these all browned up just like you did the onions. Just make sure that you aren't cooking them. Remove those and now it's time to get your roast seared. By this time your roast should of already been seasoned with just salt. Now throw on a little bit of pepper.

Make sure to hold it on the sides and get them all browned as well. Remove it from the pan and place on a plate. Now put in a cup of the beef stock and it's time to deglaze your pan. Get all that good stuff scraped from the bottom of the pan.
You are actually suppose to use a dutch oven, but I don't have one, so I used my crock pot. What I did was took that cup of beef stock with the yummy stuff from the bottom of the pan and placed that into my crock pot. Placed the meet in there, then the onions and carrots. Put in more beef stock....just enough to cover 1/2 of the meet. Now it's time to place the good stuff in there. A couple of sprigs of rosemary (make sure to use fresh) and a couple of thyme (fresh as well). If you stuff them deep into the liquid it really makes a difference.
Before done picture:

After done picture:

Dessert: Mocha Brownies
Just the name Mocha with the word Brownies sounds wonderful, don't it. And I'm actually eating a piece while I'm writing this. :)
I had two great helpers to make these.


Melt the chocolate in the microwave. Make sure not the burn the chocolate. Burnt chocolate...eww that just doesn't sound good.
Cream together your butter (2 sticks), and sugar (2 cups). Then beat in your eggs. Add the melted chocolate to that mixture. And the vanilla extract (3 teaspoons)

Time to add in your flour (1 1/4 cups all purpose). Mix that until combined. Make sure not to overmix.
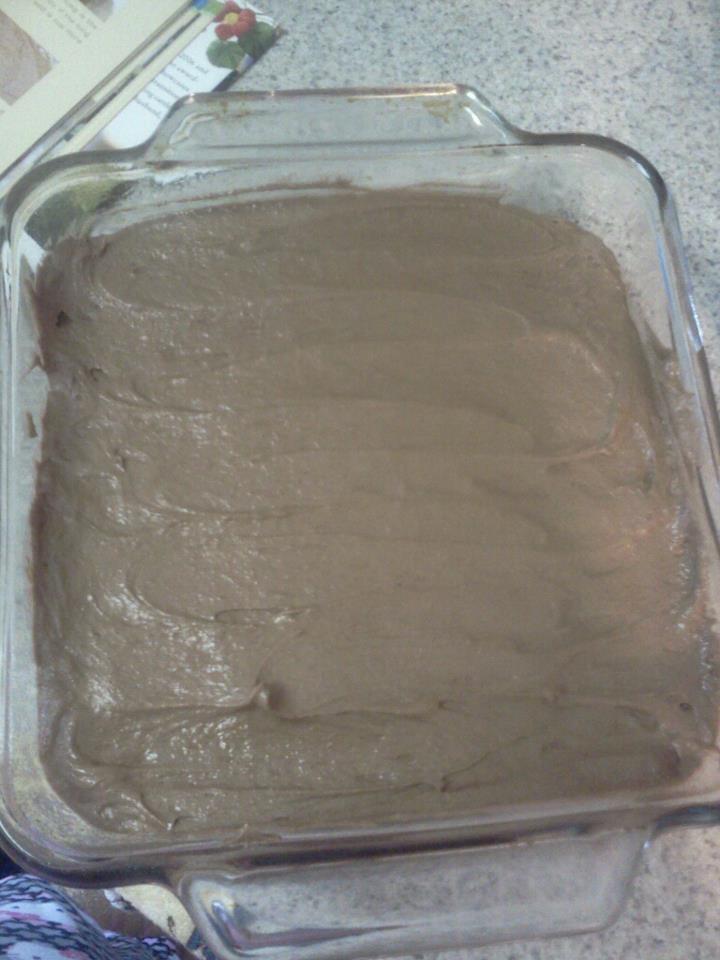
Now place it in a 8" baking pan (spray the pan with non-stick cooking spray). Spread it around to make it even.
Cook at 325 degrees for 45-50 minutes, or until the center is no longer soft. Once those are done set aside and let them cool completely.
To make the icing. Back to the mixing bowl :) Combine the butter (2 sticks), powder sugar (5 cups), cocoa powder (1/4 cup), salt (1/4 teaspoon), and vanilla (3 teaspoons). Mix until slightly combined. Then add in 1/2 cup of room temperature brewed coffee.

The icing should be light and fluffy. So don't go and add a whole pot of coffee.
Once your brownies are cooled it's time to ice them. The recipe says to put the icing on thick....I didn't do that part. Here I am again not following directions. I'm not good at this following directions thing.
But it didn't affect the look or taste.

Yes you are to place it in the fridge to get the icing to firm up. Oh it taste so good. How great is it, we have the mocha brownies right by the yogurt. :)
ENJOY!
Here are the recipes:
No comments:
Post a Comment